前言
建议把代码复制到pycharm等IDE上面看实际效果,方便理解嗷❤️
序篇:1-3部分:PyQt5基础与常用控件
第1部分:初识 PyQt5 和安装
1.1 什么是 PyQt5?
PyQt5 是 Python 的图形用户界面 (GUI) 框架,它基于强大的 Qt 库。Qt 是一个跨平台的 C++ 框架,用于构建桌面应用程序。通过 PyQt5,我们可以用 Python 轻松构建跨平台的桌面应用程序,支持 Windows、macOS 和 Linux。
1.2 在 PyCharm 中安装 PyQt5
打开 PyCharm: 打开你的 PyCharm 编辑器,确保你已经有一个项目或新建一个项目。
安装 PyQt5: 你可以在 PyCharm 中使用两种方式安装 PyQt5:
方法 1:通过 PyCharm 的设置安装
- 点击 File -> Settings。
- 在设置界面中,选择 Project -> Python Interpreter。
- 点击右侧的 + 按钮,搜索 PyQt5。
- 选择 PyQt5 并点击 Install Package 安装。
方法 2:通过 PyCharm 终端安装
检查安装是否成功: 你可以通过在终端中运行 pip list 查看是否安装了 PyQt5。
1.3 在 PyCharm 中编写第一个 PyQt5 应用程序
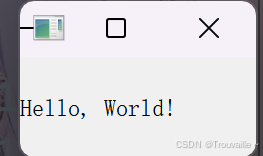
接下来,我们将在 PyCharm 中创建一个简单的 PyQt5 应用程序,显示一个包含 “Hello, World!” 的窗口。
- 创建 Python 文件:
- 在 PyCharm 项目中,右键点击项目文件夹,选择 New -> Python File,将文件命名为
main.py。
- 编写代码: 在新建的
main.py 文件中,输入以下代码:
1
2
3
4
5
6
7
8
9
10
11
12
13
14
15
16
17
18
19
20
21
22 | import sys
from PyQt5.QtWidgets import QApplication, QLabel, QMainWindow
class MainWindow(QMainWindow):
def __init__(self):
super().__init__()
self.setWindowTitle("PyQt5 第一个窗口")
label = QLabel("Hello, World!", self)
self.setCentralWidget(label)
app = QApplication(sys.argv)
window = MainWindow()
window.show()
sys.exit(app.exec_())
|
1.4 代码详细解释
import sys- 作用:
sys 是 Python 的内置模块,提供了一些与 Python 解释器进行交互的功能。在 PyQt5 中,sys.exit() 用来确保应用程序关闭时退出干净,不留任何后台进程。
from PyQt5.QtWidgets import QApplication, QLabel, QMainWindowQApplication:每个 PyQt5 程序必须有一个 QApplication 实例,它管理应用程序的控制流和设置。QMainWindow:这是 PyQt5 中的主窗口类,它是所有复杂窗口的基础。可以包含菜单栏、工具栏、状态栏、中央控件等。QLabel:这是一个简单的控件,用于显示文本。
class MainWindow(QMainWindow):- 作用:定义了一个名为
MainWindow 的类,继承自 QMainWindow。通过继承 QMainWindow,我们可以自定义窗口的行为和外观。
self.setWindowTitle("PyQt5 第一个窗口")- 作用:设置窗口的标题,标题显示在应用程序窗口的顶部。
label = QLabel("Hello, World!", self)- 作用:创建一个
QLabel 控件,显示文本 “Hello, World!”。 self 参数:将标签关联到当前窗口(MainWindow),即将其设置为窗口的子控件。
self.setCentralWidget(label)- 作用:设置
label 为窗口的中央控件,中央控件是填充窗口中间区域的控件。
app = QApplication(sys.argv)- 作用:
QApplication 是 PyQt5 应用程序的基础,每个 PyQt5 应用程序都必须有一个 QApplication 实例,它管理整个应用程序的生命周期和事件处理。 sys.argv:传递命令行参数,通常可以忽略。
window.show()sys.exit(app.exec_())- 作用:
app.exec_() 开始应用程序的事件循环,保持应用程序的持续运行,直到用户关闭窗口。sys.exit() 确保应用程序正常退出。
1.5 在 PyCharm 中运行程序
- 确保你的 PyQt5 安装正确,并且代码已经保存。
- 点击 PyCharm 界面顶部的绿色 Run 按钮,或者右键点击代码文件并选择 Run ‘main’。
运行代码后,你将看到一个包含 “Hello, World!” 的窗口弹出。
1.6 常见问题排查
- 没有安装 PyQt5:确保你已经在项目的解释器中正确安装了 PyQt5,可以通过
pip list 命令检查是否安装。 - 解释器配置错误:确保 PyCharm 中使用的 Python 解释器与安装了 PyQt5 的 Python 版本一致。
- 窗口不显示:检查代码中是否调用了
window.show(),没有调用该方法窗口将不会显示。
1.7 总结
- PyQt5 是一个非常强大的 GUI 框架,适合用于创建桌面应用程序。
- 我们通过简单的几行代码,创建了一个带有文本标签的基本窗口。
- 你可以通过 PyCharm 轻松运行 PyQt5 程序,并使用其强大的功能来构建复杂的用户界面。
第2部分:创建 PyQt5 应用程序与布局管理
2.1 PyQt5 的基本窗口结构
在 PyQt5 中,窗口(window)是应用程序的核心部分。我们已经了解了如何创建一个简单的 QMainWindow,并在其中显示一些基本内容,比如文本标签 (QLabel)。现在,我们将进一步了解 PyQt5 中的 布局管理,并学习如何合理地组织多个控件,使界面更具交互性和美观性。
2.2 基本的 PyQt5 窗口与布局
QWidget 与 QMainWindow 的区别
QWidget:是 PyQt5 中的所有控件(如按钮、标签、文本框等)的基类。任何可视化控件基本上都可以继承自 QWidget。它也是最基础的窗口控件,可以用来创建简单的窗口。QMainWindow:是一个高级窗口控件,继承自 QWidget,但是它具有更多的功能,比如菜单栏、工具栏、状态栏等。你可以把 QMainWindow 理解为一个“带更多功能的高级窗口”。
2.3 布局管理器
在开发 GUI 应用程序时,如何排列和管理窗口中的控件至关重要。PyQt5 提供了几个常用的布局管理器,让控件自动调整位置和大小。常见的布局管理器有:
- QVBoxLayout:垂直布局管理器,控件从上到下排列。
- QHBoxLayout:水平布局管理器,控件从左到右排列。
- QGridLayout:网格布局管理器,控件按网格排列。
- QFormLayout:表单布局管理器,适合排列标签和输入框。
2.4 在窗口中使用布局管理器
我们来创建一个包含多个控件的窗口,使用 QVBoxLayout 和 QHBoxLayout 来组织这些控件。
完整代码:
1
2
3
4
5
6
7
8
9
10
11
12
13
14
15
16
17
18
19
20
21
22
23
24
25
26
27
28
29
30
31
32
33
34
35
36
37
38
39
40
41
42
43
44
45 | import sys
from PyQt5.QtWidgets import QApplication, QMainWindow, QWidget, QVBoxLayout, QHBoxLayout, QPushButton, QLabel
class MainWindow(QMainWindow):
def __init__(self):
super().__init__()
self.setWindowTitle("PyQt5 布局示例")
central_widget = QWidget(self)
self.setCentralWidget(central_widget)
vbox_layout = QVBoxLayout()
label = QLabel("这是一个标签")
vbox_layout.addWidget(label)
hbox_layout = QHBoxLayout()
button1 = QPushButton("按钮 1")
button2 = QPushButton("按钮 2")
hbox_layout.addWidget(button1)
hbox_layout.addWidget(button2)
vbox_layout.addLayout(hbox_layout)
central_widget.setLayout(vbox_layout)
app = QApplication(sys.argv)
window = MainWindow()
window.show()
sys.exit(app.exec_())
|
2.5 代码详解
QWidget 与 QMainWindow:- 我们使用了
QMainWindow 作为主窗口,主窗口需要设置一个中央控件,所以我们创建了一个 QWidget 实例 central_widget。 setCentralWidget() 方法用于将 QWidget 设置为 QMainWindow 的中央控件,这个中央控件是放置所有其他控件的容器。
- 布局管理器:QVBoxLayout 与 QHBoxLayout:
QVBoxLayout 是一个垂直布局管理器,控件会从上到下排列。QHBoxLayout 是一个水平布局管理器,控件会从左到右排列。- 我们先在窗口中添加了一个标签,然后再添加了两个水平排列的按钮。按钮排列在水平布局中,水平布局本身又嵌入到了垂直布局中,形成了一种灵活的组合布局。
- 添加控件到布局:
vbox_layout.addWidget(label) 将标签控件添加到垂直布局中。hbox_layout.addWidget(button1) 和 hbox_layout.addWidget(button2) 将按钮控件添加到水平布局中。
- 布局嵌套:
- 通过
vbox_layout.addLayout(hbox_layout),我们将水平布局嵌入到垂直布局中,实现更复杂的布局结构。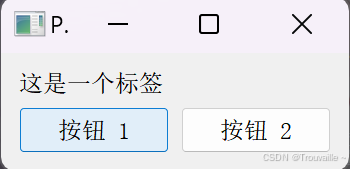
2.6 更多布局管理器介绍
QGridLayout (网格布局管理器)
QGridLayout 允许你以网格的形式排列控件,每个控件可以放置在指定的行和列中。它适合用来创建表单或矩阵式的控件布局。
QGridLayout 示例:
1
2
3
4
5
6
7
8
9
10
11
12
13
14
15
16
17
18
19
20
21
22
23
24
25 | from PyQt5.QtWidgets import QApplication, QWidget, QGridLayout, QLabel, QPushButton
import sys
class MainWindow(QWidget):
def __init__(self):
super().__init__()
self.setWindowTitle("QGridLayout 示例")
layout = QGridLayout()
layout.addWidget(QLabel("标签 1"), 0, 0)
layout.addWidget(QPushButton("按钮 1"), 0, 1)
layout.addWidget(QLabel("标签 2"), 1, 0)
layout.addWidget(QPushButton("按钮 2"), 1, 1)
self.setLayout(layout)
app = QApplication(sys.argv)
window = MainWindow()
window.show()
sys.exit(app.exec_())
|
代码详解:
- QGridLayout():创建了一个网格布局对象。
- addWidget(widget, row, column):将控件添加到指定的行和列中,比如
(0, 0) 表示控件放置在第一行第一列。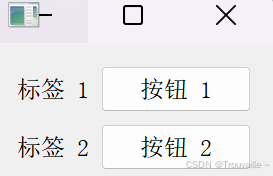
2.7 总结
在这一部分中,我们学习了如何在 PyQt5 中使用布局管理器来组织窗口内的控件。我们主要介绍了几种常见的布局方式:
- QVBoxLayout:垂直排列控件。
- QHBoxLayout:水平排列控件。
- QGridLayout:网格方式排列控件。
通过使用这些布局管理器,我们可以让窗口中的控件自动调整位置和大小,而不需要手动计算控件的坐标。
这部分在之后还会有更加详细的介绍
第3部分:常用控件详解
在 PyQt5 中,常用的控件(也称为小部件)有很多,它们可以用来实现用户界面中的各种元素,比如按钮、文本框、复选框等。接下来,我们将逐一介绍,并展示如何使用这些控件。
3.1 QLabel(标签)
QLabel 是一个用于显示文本或图片的控件。它是最简单的控件之一,常用于显示静态文本。
代码示例:
1
2
3
4
5
6
7
8
9
10
11
12
13
14
15
16
17
18
19
20
21
22
23 | from PyQt5.QtWidgets import QApplication, QLabel, QMainWindow
from PyQt5.QtCore import Qt
import sys
class MainWindow(QMainWindow):
def __init__(self):
super().__init__()
self.setWindowTitle("QLabel 示例")
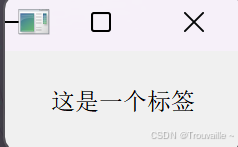
label = QLabel("这是一个标签", self)
label.setAlignment(Qt.AlignCenter)
self.setCentralWidget(label)
app = QApplication(sys.argv)
window = MainWindow()
window.show()
sys.exit(app.exec_())
|
代码详解:
QLabel:用于显示文本的控件。你可以设置标签的内容、字体、对齐方式等。setAlignment(Qt.AlignCenter):将标签的文本设置为居中对齐。self.setCentralWidget(label):将标签设置为窗口的中央控件。
3.2 QPushButton(按钮)
QPushButton 是一个按钮控件,用户可以点击按钮来触发事件。它是最常见的控件之一。
代码示例:
1
2
3
4
5
6
7
8
9
10
11
12
13
14
15
16
17
18
19
20
21
22
23
24
25
26 | from PyQt5.QtWidgets import QApplication, QMainWindow, QPushButton
import sys
class MainWindow(QMainWindow):
def __init__(self):
super().__init__()
self.setWindowTitle("QPushButton 示例")
button = QPushButton("点击我", self)
button.clicked.connect(self.button_clicked)
self.setCentralWidget(button)
def button_clicked(self):
print("按钮被点击!")
app = QApplication(sys.argv)
window = MainWindow()
window.show()
sys.exit(app.exec_())
|
代码详解:
QPushButton:创建了一个按钮控件,显示文本为“点击我”。button.clicked.connect(self.button_clicked):连接按钮的点击信号到自定义的 button_clicked 方法。当按钮被点击时,这个方法会被触发。self.button_clicked:定义了一个槽函数,用于响应按钮点击事件。在槽函数中,程序会打印 “按钮被点击!”。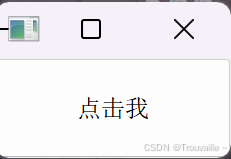
3.3 QLineEdit(单行文本框)
QLineEdit 是一个单行文本框,用于让用户输入文本。你可以获取用户输入的文本并对其进行处理。
代码示例:
1
2
3
4
5
6
7
8
9
10
11
12
13
14
15
16
17
18
19
20
21
22
23
24
25
26
27
28
29
30 | from PyQt5.QtWidgets import QApplication, QMainWindow, QLineEdit
import sys
class MainWindow(QMainWindow):
def __init__(self):
super().__init__()
self.setWindowTitle("QLineEdit 示例")
self.line_edit = QLineEdit(self)
self.line_edit.setPlaceholderText("请输入文本")
self.setCentralWidget(self.line_edit)
self.line_edit.returnPressed.connect(self.return_pressed)
def return_pressed(self):
text = self.line_edit.text()
print(f"用户输入: {text}")
app = QApplication(sys.argv)
window = MainWindow()
window.show()
sys.exit(app.exec_())
|
代码详解:
QLineEdit:创建了一个单行文本框控件,允许用户输入文本。setPlaceholderText():设置占位符文本,当用户没有输入时显示提示文本。self.line_edit.returnPressed.connect(self.return_pressed):连接用户按下“回车键”时的信号到 return_pressed 槽函数,获取输入文本并打印出来。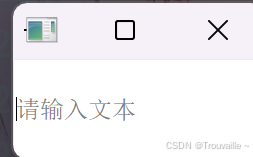
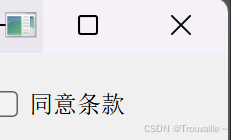
3.4 QCheckBox(复选框)
QCheckBox 是一个复选框,用户可以选择或取消选择该选项。它通常用于让用户勾选某些偏好或选项。
代码示例:
1
2
3
4
5
6
7
8
9
10
11
12
13
14
15
16
17
18
19
20
21
22
23
24
25
26
27
28 | from PyQt5.QtWidgets import QApplication, QMainWindow, QCheckBox
import sys
class MainWindow(QMainWindow):
def __init__(self):
super().__init__()
self.setWindowTitle("QCheckBox 示例")
self.checkbox = QCheckBox("同意条款", self)
self.checkbox.stateChanged.connect(self.checkbox_changed)
self.setCentralWidget(self.checkbox)
def checkbox_changed(self, state):
if state == Qt.Checked:
print("复选框被勾选")
else:
print("复选框未被勾选")
app = QApplication(sys.argv)
window = MainWindow()
window.show()
sys.exit(app.exec_())
|
代码详解:
QCheckBox:创建一个复选框,显示文本为“同意条款”。self.checkbox.stateChanged.connect(self.checkbox_changed):连接复选框状态改变的信号到槽函数 checkbox_changed,当用户勾选或取消勾选时会触发相应的事件。checkbox_changed(self, state):根据复选框的状态(勾选或未勾选)打印相应的消息。
3.5 QComboBox(下拉列表)
QComboBox 是一个下拉列表控件,用户可以从中选择一个选项。
代码示例:
1
2
3
4
5
6
7
8
9
10
11
12
13
14
15
16
17
18
19
20
21
22
23
24
25
26
27
28
29
30 | from PyQt5.QtWidgets import QApplication, QMainWindow, QComboBox
import sys
class MainWindow(QMainWindow):
def __init__(self):
super().__init__()
self.setWindowTitle("QComboBox 示例")
self.combobox = QComboBox(self)
self.combobox.addItems(["选项 1", "选项 2", "选项 3"])
self.combobox.currentIndexChanged.connect(self.combobox_changed)
self.setCentralWidget(self.combobox)
def combobox_changed(self, index):
text = self.combobox.currentText()
print(f"当前选中: {text}")
app = QApplication(sys.argv)
window = MainWindow()
window.show()
sys.exit(app.exec_())
|
代码详解:
QComboBox:创建一个下拉列表控件,用户可以从中选择选项。self.combobox.addItems():向下拉列表中添加选项。currentIndexChanged.connect():连接下拉列表选项改变的信号到 combobox_changed 槽函数,当用户选择不同的选项时会打印选中的文本。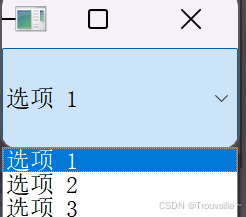
3.6 总结
在这一部分中,我们介绍了 PyQt5 中一些常见的控件,分别是:
- QLabel:显示静态文本或图片。
- QPushButton:创建按钮,用户点击触发事件。
- QLineEdit:单行文本框,用户可以输入文本。
- QCheckBox:复选框,用户可以选择或取消选择。
- QComboBox:下拉列表,用户可以选择一个选项。
这些控件是 GUI 应用程序的基础组成部分,它们让应用程序更加互动和可操作。
1-3部分总结
第1至第3部分中,我们介绍了 PyQt5 的基础知识和一些常用的控件。首先,我们讲解了如何安装 PyQt5,并创建了一个简单的 PyQt5 应用程序。接着,介绍了布局管理器(如 QVBoxLayout 和 QHBoxLayout),并通过它们组织界面中的控件。最后,我们深入探讨了 PyQt5 中的常用控件,如 QLabel、QPushButton、QLineEdit 和 QCheckBox,展示了如何使用这些控件处理基本的用户交互。
该文章在 2025/2/14 11:54:20 编辑过


 400 186 1886


